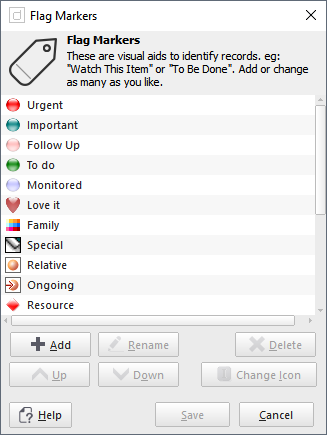
Flag Markers are special marker points on certain database records, such as on a Note or a Contact. You can assign a flag marker on Notes, Events, Tasks, Contacts, Planners, Noteboard Blocks and Journals.
The markers are useful in identifying the status of the record. eg: you could have a flag marker called "todo" which you use for assigning against a Note, or you could assign a flag marker to a contact called "Follow up", identifying that this contact needs attention.
These flag marked items can be listed on your Home Page as a quick access to the item.
See "Changing the Home Page" for more information.
Managing The Flag Markers
You can add, remove or edit the flag marker names and icon. You are free to add your own or change the default ones.
To Add, Edit or Delete Flag Markers
Choose from the Main Menu "Tools/Edit Flag Markers".
Use the Flag Markers editor window to:
Add - Adds a new flag marker.
Edit - Allows you to rename the flag marker with your own text. This must be unique and can't be blank.
Delete - Delete the flag marker. Be careful if you have records in your database that have been flagged with the marker you are deleting.
Move Up - Moves the flag marker up in the list. This affects the combo boxes and menu lists where the flags are displayed.
Move Down - Moves the flag marker down in the list. This affects the combo boxes and menu lists where the flags are displayed.
Icon - Change the icon of the selected flag
See Icon Library for more information

Click on Save to save the changes or click on Cancel to cancel the changes.
Assigning A Flag Marker
Within each of the relevant sections, there provides a method for assigning a flag marker to a record.
To Assign Or Clear A Flag Marker On A Note, Noteboard, Journal Or Planner
Go to the relevant section, then,
either:
Right Click on the item you want to flag in the Folder's Navigator, eg: a Note, then select "Properties" from the context menu, or
Press the keyboard shortcut: Ctrl+R to show the Properties dialog window.
Then choose the "Details" tab of the Properties dialog window.
In the group "Flag Marker", click on "Flag this item as" then use the combo box list of flags to choose the flag you want to assign, or click "Not Flagged" to unflag it.
Finally click on Save to accept the choice or click on Cancel to cancel the changes.
If the flag is assigned correctly, you should now notice the flag marker icon will show to the left of the item's icon in the Navigator.
To Assign Or Clear A Flag Marker On A Contact
Go to the Contacts section then highlight and select the desired contact in the Card View or the List View, then, either:
Click on icon "Flag/Mark the Selected Contact as.." located on the Contact's Toolbar then choose the appropriate flag from the drop down list
TIP: When you select the flag marker, the icon on the toolbar will change to the last selected flag, so the next time you want to
flag another contact with the same flag, you only have to click on the icon without clicking on the drop down arrow.
Right Click on the contact you want to flag, then select "Edit Selected Contact" from the context menu, or
Double Click on the contact, or.
Press the keyboard shortcut: Ctrl+E to show the Contacts Editor window.
With the Contacts Editor window:
On the bottom of the Contacts Editor window, tick "Flag this contact as" then use the combo box list of flags to choose the flag you want to assign, or untick it to unflag it.
Finally click on Save to accept the changes or click on Cancel to cancel the changes.
If the flag is assigned correctly, you should now notice the flag marker icon will show to the left of the contact's name in the Card View or in the first column of the List View.
Related Topics
Guide to Automatic Folder Naming